Easy Bread
My take on making Jim Lahey’s No-Knead Bread even simpler

I love making bread. It does, however, lead to more bread than I can eat, which leads to me giving away loaves of bread at every opportunity. Occasionally this leads to someone asking me how I make bread.
These days I follow the recipes in Ken Forkish’s book Flour Water Salt Yeast as closely as possible. It’s an excellent book and I’ve had much better results with his recipes than any other source I’ve tried.
For about year when I was getting started, I used Jim Lahey’s “No-Knead Bread” recipe. It strikes the perfect balance of easy, beginner friendly, and tasty. There is a delightful tradeoff in bread between fast and easy; you can make good bread in 5 hours with a lot of work or you can make great bread in 18-24 hours with almost no work. Mr. Lahey’s recipe swings all the way toward easy, eliminating the kneading entirely. A friend of mine made a couple tweaks to simplify it and over time, I’ve made a couple tweaks of my own to make it more foolproof.
The only ingredients you need are all-purpose flour, water, salt, and instant yeast. The long rise means you only need a tiny bit of yeast, so one packet will make several loaves of bread. This recipe can also work with a sourdough starter instead of yeast, but it’s more complicated. I also find I end up with less consistent results. If you want sourdough, I recommend jumping right to the recipes in Flour Water Salt Yeast.
I use a kitchen scale to measure ingredients because it gives much more consistent results. It’s also less cleanup! Just set your bowl on the scale and dump the ingredients into it, no measuring cup necessary. I really believe weighing ingredients is one of the easiest things you can do to improve your baking. If you’re not ready to commit to a scale, try the volumetric amounts in the No-Knead recipe I linked above, but your milage may vary, I’ve never done it.
You’ll also need some parchment and something to bake in. Ideally, it will be enclosed to keep the moisture in. I use two cast iron pans that are sold as a set and fit together. A dutch oven works well but most of them have a handle on top that can’t stand the temperatures involved, so make sure to remove it beforehand. If all you have is a baking sheet, try it out and let me know how it goes. Yeasted bread is incredibly forgiving.
The timeline here is: a bit of work, 12–18 hours of waiting, a bit of work, 2–3 hours of waiting (with the oven pre-heating at the end), and an hour or so bake. There are peak times during the two windows of waiting, but at first, it’s fine to just use whatever is most convenient for your schedule.
That’s it. Let’s make bread.
- 500g all-purpose flour
- 400g water
- 11g salt
- 1/8 teaspoon instant yeast (most scales, including mine, are not accurate enough to weigh such a small amount)
Step 1: In the evening on the day before you want bread, mix together all the ingredients in a bowl that’s big enough for it to double or triple in size. Cover in plastic wrap and leave it somewhere that’s as close to 70F as possible.

Step 2: Anywhere between 12–18 hours later, it’ll look like below. This is called the bulk rise.

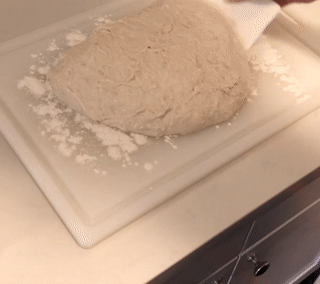
Step 3: Next is shaping. Most bread recipes have you use as little flour as possible, but more flour makes it easier and the worst I’ve seen happen is a streak of flour in the middle of the finished bread. Which is fine. If anything it just makes it seem more homemade. A trick of my own: if you have a large enough cutting board to fit the bread, it makes cleanup much easier than a counter. Sprinkle a generous amount of flour and dump the dough onto it. Use a scraper or a spatula or anything flat to fold it into a (flat, loose) ball with the flour side out.
I find that 10–15 (gentle!) kneads here make it easier to shape. This is pretty late in the process to be working it this much and will push out some bubbles. There’s a better way to accomplish the same thing (using the “folds” method described by Flour Water Salt Yeast), but the kneads here are a lot easier and you still end up with a good bread.

Before shaping, make sure the dough isn’t sticky on the outside. If it is, dust a good amount of flour on it (in the video below, I don’t have nearly enough flour and you can see my hands sticking). If your hands have dough on them, wash it off. Then cover them with as much flour as will stick to them. Dust a piece of parchment paper with some flour.
Pick the dough up with your fingertips pointed toward the middle of the bottom. Then create some tension by gently pushing the bottom up into the middle. Rotate and repeat a few times. Set the dough seam side down on the floured parchment. Dust the top with flour and put another piece of parchment on the top to keep it from drying out.

Step 4: Let it sit for 2–3 hours before baking. This is called the final rise. It will take a while for the oven to preheat to 500F, so make sure to turn it on (with your baking container in it!) an hour or so before the end of the final rise.

Step 5: When the final rise finishes and the oven is pre-heated, take the extremely hot container out and flip the dough into it so the seam side is up. The seam will allow gases to escape (good) and bake into a beautiful top. Put on your container’s top and put it in the oven. Lower the temp to 450F and let it bake for 30 minutes before uncovering. This uncovering is my favorite part! You get to see the final shape of your bread, which I find incredibly satisfying and a bit magical. Bake at least 15 minutes uncovered before starting to check for doneness.
It’s done when the outside is at least golden brown, but the darker it gets short of burning the more flavor it will have, so leave it in for as long as your nerve holds, up to 60 minutes total.
Once it’s ready, take it out and let it cool on a wire rack or leaned up against something, so the bottom can breathe. If you cut it before it has cooled 20–30 minutes, the rest of the loaf will collapse a bit. But warm bread is awesome, so maybe you don’t care.
Here’s my first bread, from ~1 year ago.

Enjoy and send me pictures!
Thanks to Kat and Arjun.